
Listen closely because I am about to give away the secret sauce to creating a cohesive well-designed room. We are sharing the key step we all use, and the good news? You can do this too. It’s pretty easy! Here’s the secret…
We create moodboards
There you have it.
Whether you are working on a personal project or professional project for someone else, a mood board is a visual representation of a thought or concept. In simplest terms, a mood board could be a collage of pictures that pinpoints motivation or a vision. The general objective is to set up a clear direction before moving forward with the starting stages of design work. Moreover, the reason for a mood board is to help in exploring thoughts that offer assistance in figuring out the style, mood, colours of the project or individual space, and ultimately to make decisions about what works and what doesn’t work.
Understanding Terminology
The term mood board is used for different meanings in different industries. Many people confuse the terms inspiration boards, mood boards, style boards, and concept boards and use the terms interchangeably. Here’s the distinction between the two we live by. A mood board is a gathering of pictures, materials, pieces of content, etc. intended to bring out or convey a vague mood or feeling. It gives a conceptual idea of what the final vision is. An inspiration board is a collage of images, words, and objects. For instance, fabric, paint, packaging and more. The collage is used as a reference for a designer while working on a project.
What’s the Difference?
A mood board can convey a feeling and present a conceptual or psychological outcome. An example might be rustic lodge, vs spa-like retreat. A rustic lodge might have elements like reclaimed wood, plaid wool, where a spa-like retreat could have images of watercoloured materials and patterns. To be clear, a mood board will help determine what might go into an inspiration or concept board. The main difference between the two is that an inspiration board or concept board will have specific elements or items that will be used in the end result (your room design). A mood board conceptualizes the feeling where an Inspiration Board will show final selections (or simillar ideas) and details like patterns, colours, and specific furniture pieces or cabinetry details and fixtures if it is for a renovation.
Yet, in design, many call them all moodboards so I will too. But be clear, I am talking about a representation of the result using actual items selected for a homeowne’rs space, not a conceptual sense of how it might feel.
Why We Create Moodboards
Creating a mood board helps us establish a strong foundation for what the end results may ideally look like. It is also helpful to create mood boards as they can serve to highlight various elements within a project to provide a vision or concept. Furthermore, a mood board encourages client involvement where we can prevent future mistakes. Working with a client or project, we can verbally and visually communicate ideas. It is much less costly to cut and paste a furniture piece in a moodboard to see if all the pieces work together before we order a single thing. Sometimes early in a project, we will get a false start. We start off in a direction and find it too difficult to achieve the desired result from that starting place. With a mood board, it is easy to throw out and start over. You can create many mockups before finalizing and moving forward. This is where we can save on costly mistakes!
Two Tips For Planning And Collecting Inspiration
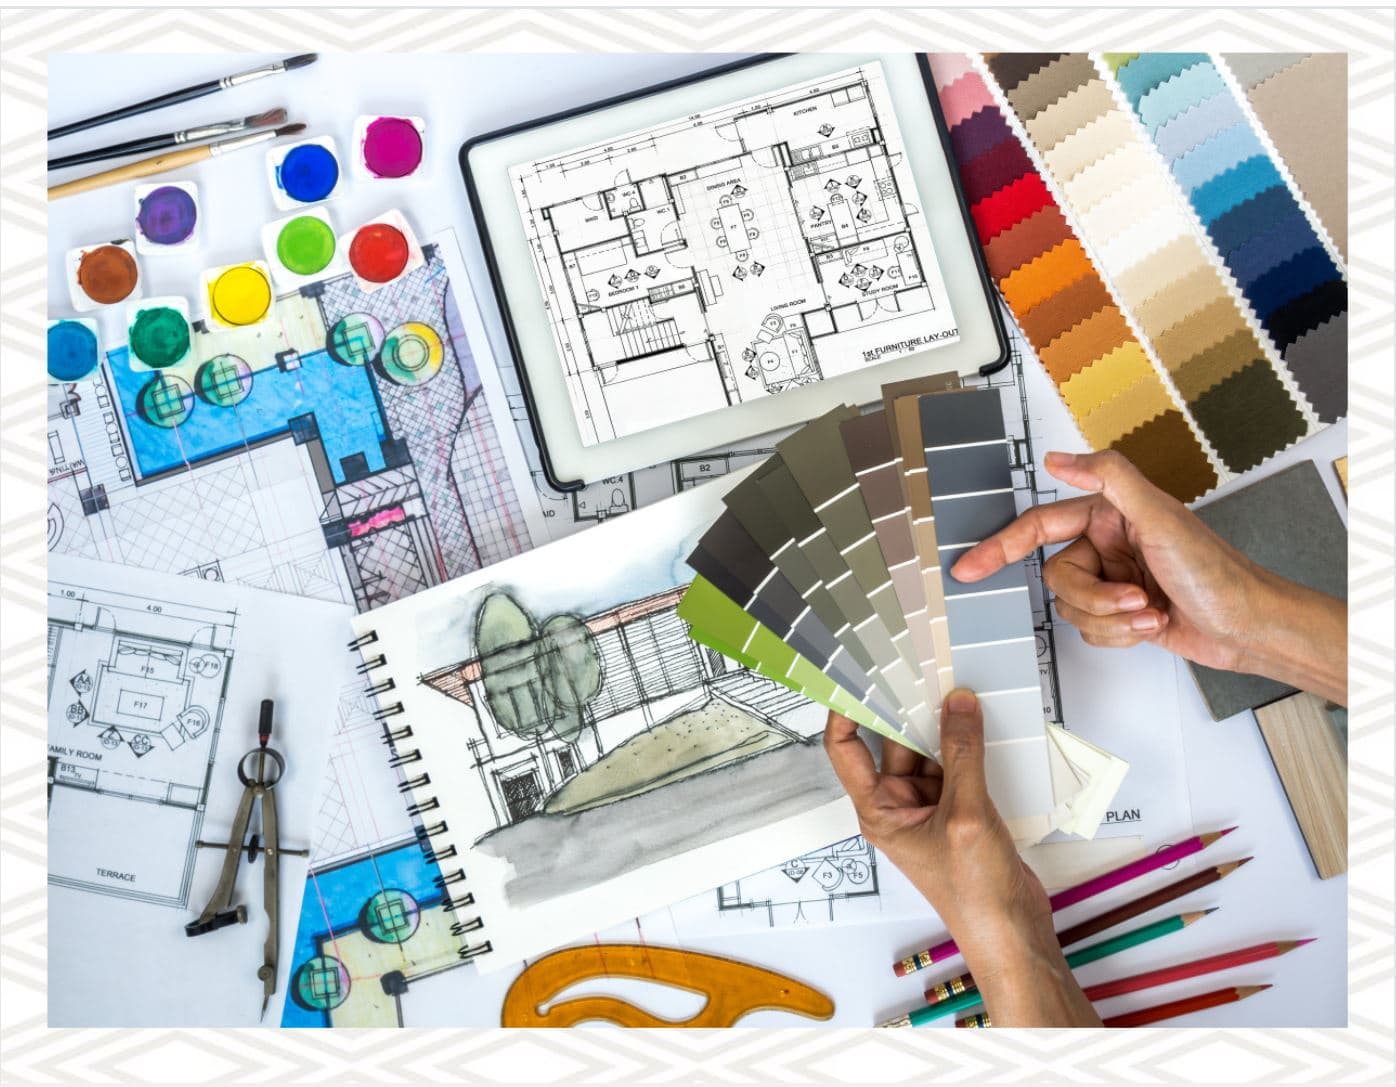
One tip to gather information or inspiration is to go through Pinterest. It is a great platform that allows you to pin images into a personalized board. You can start by pinning rooms, furniture, accessories or colour schemes that relate to your concept or ideas.
The second tip when creating a mood board is to use software or an online platform. For example, software such as Adobe Photoshop, or websites like Canva, Milanote, Sampleboard and more are great for this planning stage. Using software or online platforms will help organize your information into a collage to see what pieces are compatible with what you have collected, and what are not. Adobe photoshop is the go-to software; as designers, it is a great skill to obtain. With photoshop you have the ability to alter images, remove or customize items to the way you envision it. This is perfect when wanting to show a more in-depth vision of a concept or idea.
Full disclosure is warranted here (shhhhhhh!). Although I sometimes use photoshop, what I use most often is Microsoft Word or Powerpoint. There you have it! It has image editing capability that allows you to remove the background of an image, and float it around on a page to align pieces in a pleasing format to see how they work together. I know it is unconventional but most people have Word, and skills to use it. It is a simple solution!
Methods Of Creating A Mood Board
Through the method of making a mood board, here are two starting points:
1) Work with a concept
2) Create a mood board with a favourite piece as a starting point. (we have written before about how to start when you just don’t know where to start)
Creating a moodboard from a concept
Going through the process of creating a mood board, starting with a concept can provide a canvas to develop your idea. This leads to explaining point one, working with a concept. There are many concepts (not to be confused with theme or style), and the more specific you get, the more you hone in on a look that simplifies the decision making process. A few random examples: “urban loft meets cowboy chic”, “refined retirement pied a terre”, and so forth. These descriptors encapsulate some key qualities you want your home to have. It is a great idea to write a full concept statement.
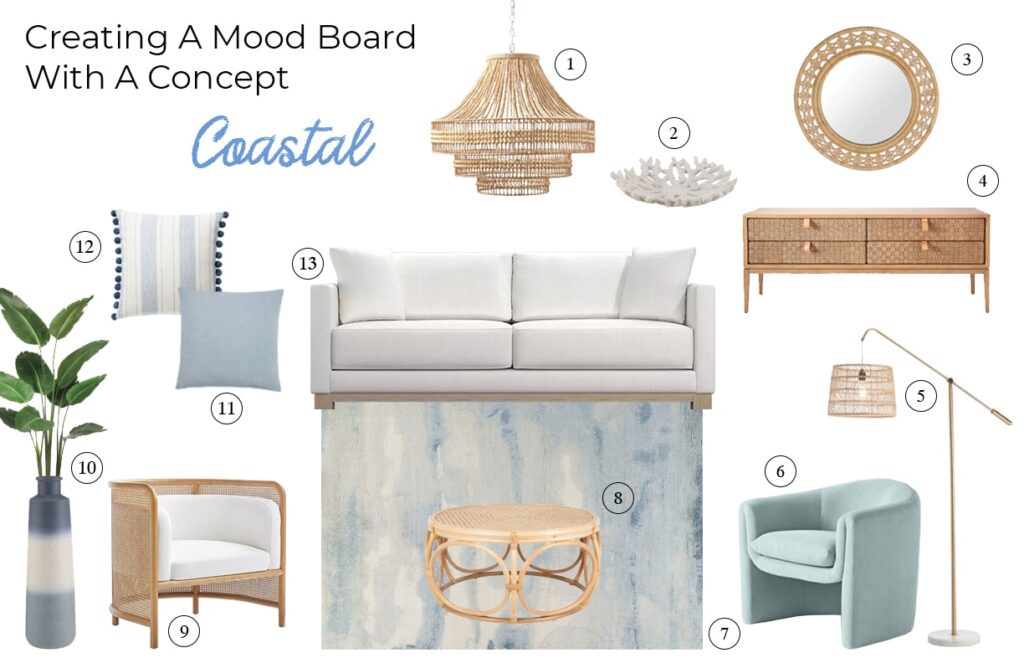
Concept – coastal
The concept chosen for the mood board displayed is coastal. Before gathering different furniture and accessories to put on the board, as mentioned, using Pinterest to gather inspiration was a great help. Looking at coastal-inspired interiors, many spaces had a pastel or light blue colour that made space stand out. Another commonality within coastal-inspired interiors is the use of light wood or rattan furniture or accessories. This struck a chord when thinking about a concept, light blue as a pop of colour reminds us of the sea, waves, and showcases a calming atmosphere. The use of light wood or rattan furniture or accessories represents natural elements found in coastal areas.

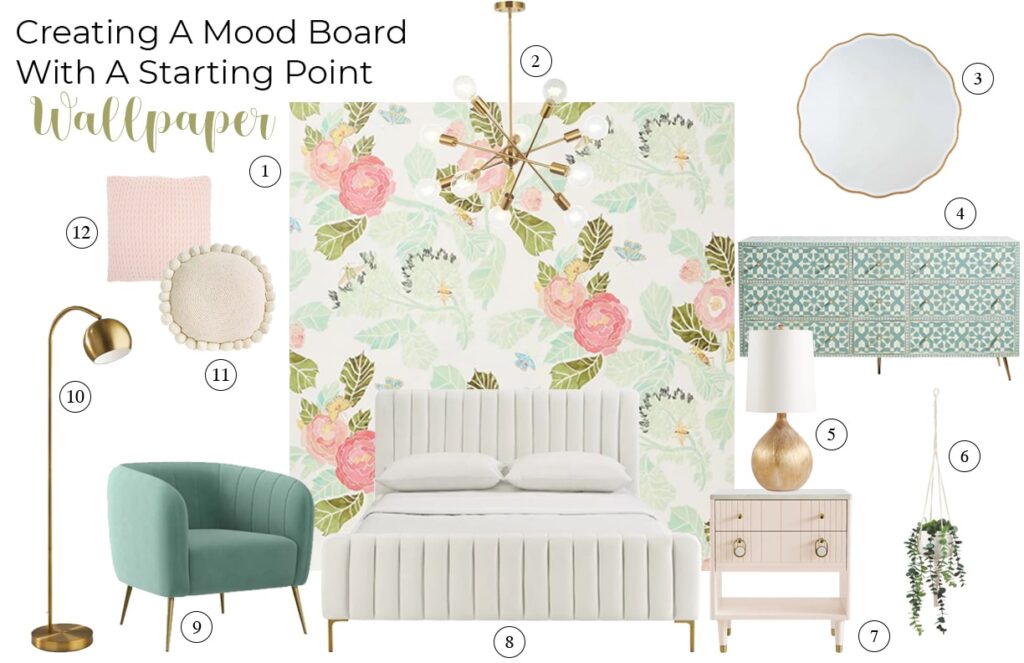
Creating a moodboard from a favourite piece as a starting point
Process two, creating a mood board with a starting point. It isn’t that often that we get to begin with a clean slate. More often than not, we start your mood board with a piece of furniture or accessory that you already have or one that inspires you and let that lead the design direction. We have a few examples below showing how we worked a design from wallpaper, artwork and rug as the starting point for each of three mood boards.
To start the moodboard emphasis the favourite piece by placing it centrally. You can exagerating the size (just a bit); making it slightly bigger than the objects surrounding it. From there, research furniture or accessories that connect with the starting points colour scheme or mood you want to create.
In this first case, a client fell in love with this wallpaper. By adding that to the moodbaord first, all the other selections need to either work with that to create a lovely room, or we discard them. Much simpler than hauling a large piece of furniture home to see if it works – yes?
Moodboard – wallpaper or pattern
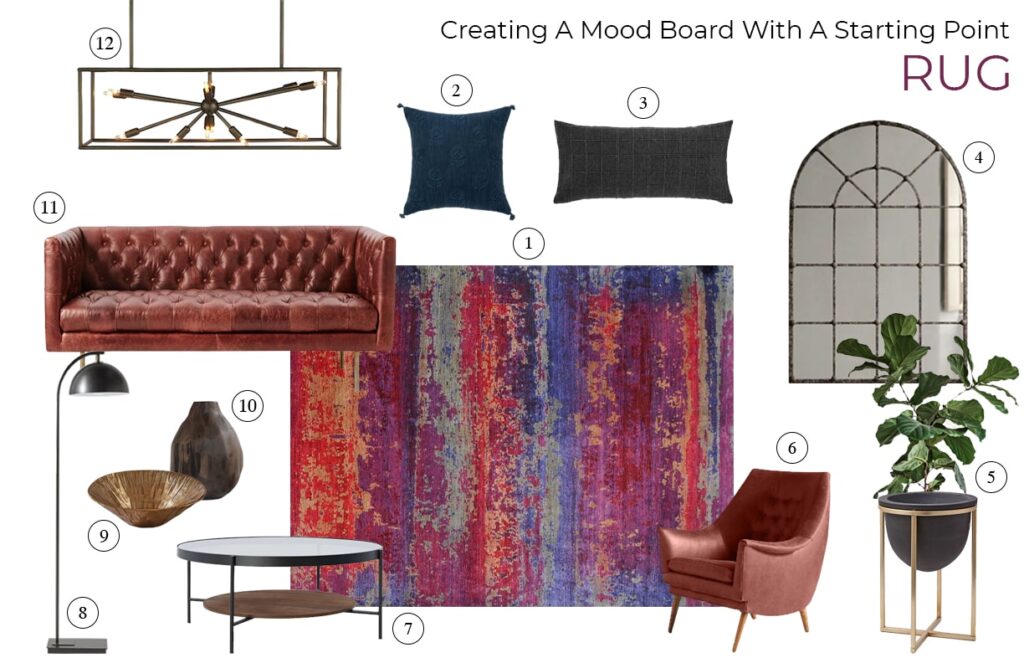
In this next moodboard, the homeowner has a valuable rug they want to work with in their now room’s design. In our moodboard, we start with that piece and begin to explore what the room could look like with various selections. Many items are rejected at this early planning phase because they don’t help achieve a balanced cohesive result. Maybe they look too heavy, or too traditional, too modern, or we simply find something we like better. The point is, we save time and money by working it out on paper first.
Moodboard – starting from a rug
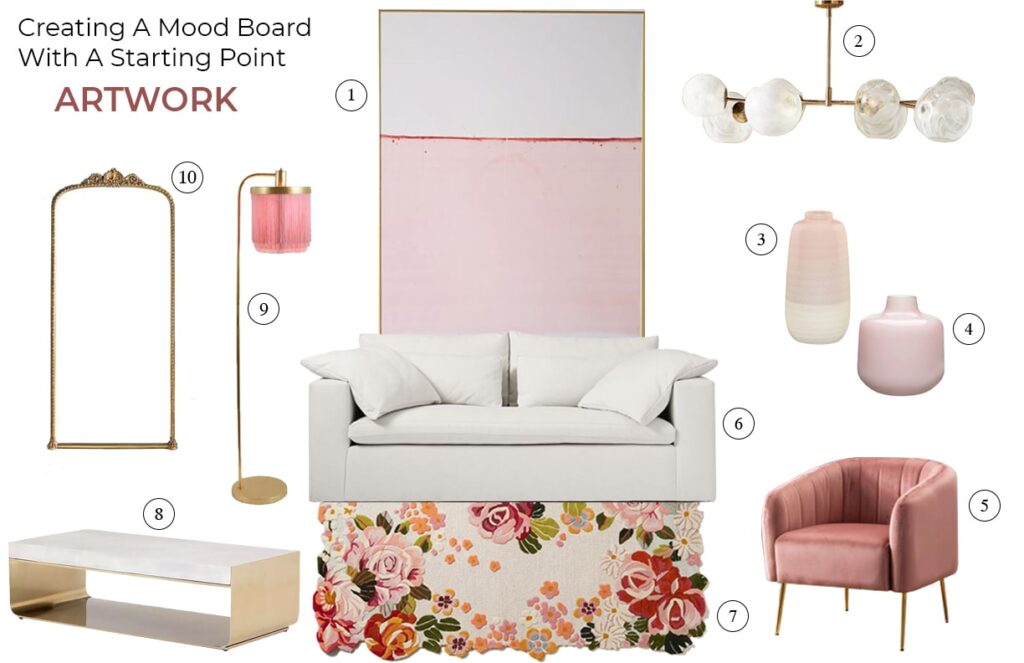
Moodboard – starting with art
Now let’s use the case where a homeowner has a painting they love. We LOVE to design a room around artwork! You can see how this one central piece makes all the other decisions easy. We could use the pretty floral rug shown here, or could have selected a more traditional pattern, or a boho rug. All of these will take the result in a different design direction, while still exploring on paper! No credit cards involved yet.
Benefits Of A Moodboard Vs An Inspiration Board
As mentioned a moodboard helps translate a style or mood when explaining a vision or a concept during the early stages. The benefits of a mood board:
- Establishes a visual of an aesthetic or feeling.
- Helps to tackle early issues.
- Help to visually translate a concept or idea when words do not help.
- Create a clearer vision to a client(s) or people, allowing them to see what is being planned.
Remember To Have Fun!
When putting together a mood board, know that it can be a powerful tool for displaying your thoughts to see how well your selections work together. Proceed to change your mood board however you like until you’re content with your work. It takes a while to create the result that you are satisfied with however, keep in mind to have fun with it!
Have you created a mood board before? If so, what was it for and how did you create it? We would love to hear about it!
My standard disclaimer: Please note, some of these items may be offered through affiliate links which means I could get a small commission if you order. That will never influence what I find lovely and want to share with you. I always offer suggestions I would buy for my home or recommend to a client. Also, rest assured it won’t affect the price you would otherwise pay.


